一、前期需要
- 新注册一个域名(要改DNS 服务器,用国内的影响正常业务,如果你本来就有闲置的就直接用),所以最好用国外的域名商,选个便宜的
- Cloudflare 账号
域名方面,我选择在https://www.namesilo.com/注册了一个纯数字的.xyz的域名,目前新开和续费都是1刀乐,比较划算,我一次性开了五年。注意域名付款后记得验证邮箱。
之后在Cloudflare的网站界面,将域名添加进去,会显示一个分配的DNS服务器:
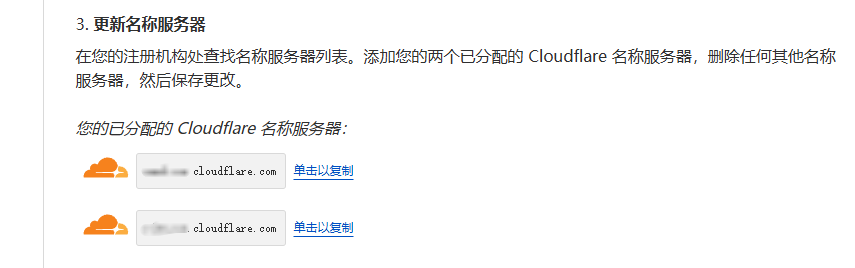
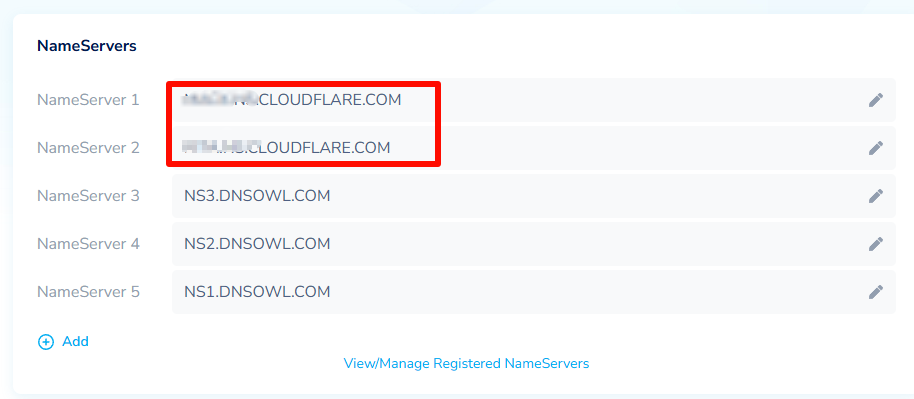
在namesilo的域名管理里可以快速设置DNS服务器,把Cloudflare分配的DNS服务器填进去:
二、创建 Worker
在 Cloudflare 创建一个 Worker,如命名为 docker,然后将以下代码粘贴到 Worker 中,并点击部署:
// _worker.js
// Docker镜像仓库主机地址
let hub_host = 'registry-1.docker.io';
// Docker认证服务器地址
const auth_url = 'https://auth.docker.io';
let 屏蔽爬虫UA = ['netcraft'];
// 根据主机名选择对应的上游地址
function routeByHosts(host) {
// 定义路由表
const routes = {
// 生产环境
"quay": "quay.io",
"gcr": "gcr.io",
"k8s-gcr": "k8s.gcr.io",
"k8s": "registry.k8s.io",
"ghcr": "ghcr.io",
"cloudsmith": "docker.cloudsmith.io",
"nvcr": "nvcr.io",
// 测试环境
"test": "registry-1.docker.io",
};
if (host in routes) return [routes[host], false];
else return [hub_host, true];
}
/** @type {RequestInit} */
const PREFLIGHT_INIT = {
// 预检请求配置
headers: new Headers({
'access-control-allow-origin': '*', // 允许所有来源
'access-control-allow-methods': 'GET,POST,PUT,PATCH,TRACE,DELETE,HEAD,OPTIONS', // 允许的HTTP方法
'access-control-max-age': '1728000', // 预检请求的缓存时间
}),
}
/**
* 构造响应
* @param {any} body 响应体
* @param {number} status 响应状态码
* @param {Object<string, string>} headers 响应头
*/
function makeRes(body, status = 200, headers = {}) {
headers['access-control-allow-origin'] = '*' // 允许所有来源
return new Response(body, { status, headers }) // 返回新构造的响应
}
/**
* 构造新的URL对象
* @param {string} urlStr URL字符串
* @param {string} base URL base
*/
function newUrl(urlStr, base) {
try {
console.log(`Constructing new URL object with path ${urlStr} and base ${base}`);
return new URL(urlStr, base); // 尝试构造新的URL对象
} catch (err) {
console.error(err);
return null // 构造失败返回null
}
}
async function nginx() {
const text = `
<!DOCTYPE html>
<html>
<head>
<title>Welcome to nginx!</title>
<style>
body {
width: 35em;
margin: 0 auto;
font-family: Tahoma, Verdana, Arial, sans-serif;
}
</style>
</head>
<body>
<h1>Welcome to nginx!</h1>
<p>If you see this page, the nginx web server is successfully installed and
working. Further configuration is required.</p>
<p>For online documentation and support please refer to
<a href="http://nginx.org/">nginx.org</a>.<br/>
Commercial support is available at
<a href="http://nginx.com/">nginx.com</a>.</p>
<p><em>Thank you for using nginx.</em></p>
</body>
</html>
`
return text;
}
async function searchInterface() {
const html = `
<!DOCTYPE html>
<html>
<head>
<title>Docker Hub 镜像搜索</title>
<meta charset="UTF-8">
<meta name="viewport" content="width=device-width, initial-scale=1.0">
<style>
:root {
--github-color: rgb(27,86,198);
--github-bg-color: #ffffff;
--primary-color: #0066ff;
--primary-dark: #0052cc;
--gradient-start: #1a90ff;
--gradient-end: #003eb3;
--text-color: #ffffff;
--shadow-color: rgba(0,0,0,0.1);
--transition-time: 0.3s;
}
* {
box-sizing: border-box;
margin: 0;
padding: 0;
}
body {
font-family: -apple-system, BlinkMacSystemFont, "Segoe UI", Roboto, "Helvetica Neue", Arial, sans-serif;
display: flex;
flex-direction: column;
justify-content: center;
align-items: center;
min-height: 100vh;
margin: 0;
background: linear-gradient(135deg, var(--gradient-start) 0%, var(--gradient-end) 100%);
padding: 20px;
color: var(--text-color);
overflow-x: hidden;
}
.container {
text-align: center;
width: 100%;
max-width: 800px;
padding: 20px;
margin: 0 auto;
display: flex;
flex-direction: column;
justify-content: center;
min-height: 60vh;
animation: fadeIn 0.8s ease-out;
}
@keyframes fadeIn {
from { opacity: 0; transform: translateY(20px); }
to { opacity: 1; transform: translateY(0); }
}
.github-corner {
position: fixed;
top: 0;
right: 0;
z-index: 999;
transition: transform var(--transition-time) ease;
}
.github-corner:hover {
transform: scale(1.08);
}
.github-corner svg {
fill: var(--github-bg-color);
color: var(--github-color);
position: absolute;
top: 0;
border: 0;
right: 0;
width: 80px;
height: 80px;
filter: drop-shadow(0 2px 5px rgba(0, 0, 0, 0.2));
}
.logo {
margin-bottom: 20px;
transition: transform var(--transition-time) ease;
animation: float 6s ease-in-out infinite;
}
@keyframes float {
0%, 100% { transform: translateY(0); }
50% { transform: translateY(-10px); }
}
.logo:hover {
transform: scale(1.08) rotate(5deg);
}
.logo svg {
filter: drop-shadow(0 5px 15px rgba(0, 0, 0, 0.2));
}
.title {
color: var(--text-color);
font-size: 2.3em;
margin-bottom: 10px;
text-shadow: 0 2px 10px rgba(0, 0, 0, 0.2);
font-weight: 700;
letter-spacing: -0.5px;
animation: slideInFromTop 0.5s ease-out 0.2s both;
}
@keyframes slideInFromTop {
from { opacity: 0; transform: translateY(-20px); }
to { opacity: 1; transform: translateY(0); }
}
.subtitle {
color: rgba(255, 255, 255, 0.9);
font-size: 1.1em;
margin-bottom: 25px;
max-width: 600px;
margin-left: auto;
margin-right: auto;
line-height: 1.4;
animation: slideInFromTop 0.5s ease-out 0.4s both;
}
.search-container {
display: flex;
align-items: stretch;
width: 100%;
max-width: 600px;
margin: 0 auto;
height: 55px;
position: relative;
animation: slideInFromBottom 0.5s ease-out 0.6s both;
box-shadow: 0 10px 25px rgba(0, 0, 0, 0.15);
border-radius: 12px;
overflow: hidden;
}
@keyframes slideInFromBottom {
from { opacity: 0; transform: translateY(20px); }
to { opacity: 1; transform: translateY(0); }
}
#search-input {
flex: 1;
padding: 0 20px;
font-size: 16px;
border: none;
outline: none;
transition: all var(--transition-time) ease;
height: 100%;
}
#search-input:focus {
padding-left: 25px;
}
#search-button {
width: 60px;
background-color: var(--primary-color);
border: none;
cursor: pointer;
transition: all var(--transition-time) ease;
height: 100%;
display: flex;
align-items: center;
justify-content: center;
position: relative;
}
#search-button svg {
transition: transform 0.3s ease;
stroke: white;
}
#search-button:hover {
background-color: var(--primary-dark);
}
#search-button:hover svg {
transform: translateX(2px);
}
#search-button:active svg {
transform: translateX(4px);
}
.tips {
color: rgba(255, 255, 255, 0.8);
margin-top: 20px;
font-size: 0.9em;
animation: fadeIn 0.5s ease-out 0.8s both;
transition: transform var(--transition-time) ease;
}
.tips:hover {
transform: translateY(-2px);
}
@media (max-width: 768px) {
.container {
padding: 20px 15px;
min-height: 60vh;
}
.title {
font-size: 2em;
}
.subtitle {
font-size: 1em;
margin-bottom: 20px;
}
.search-container {
height: 50px;
}
}
@media (max-width: 480px) {
.container {
padding: 15px 10px;
min-height: 60vh;
}
.github-corner svg {
width: 60px;
height: 60px;
}
.search-container {
height: 45px;
}
#search-input {
padding: 0 15px;
}
#search-button {
width: 50px;
}
#search-button svg {
width: 18px;
height: 18px;
}
.title {
font-size: 1.7em;
margin-bottom: 8px;
}
.subtitle {
font-size: 0.95em;
margin-bottom: 18px;
}
}
</style>
</head>
<body>
<a href="https://github.com/cmliu/CF-Workers-docker.io" target="_blank" class="github-corner" aria-label="View source on Github">
<svg viewBox="0 0 250 250" aria-hidden="true">
<path d="M0,0 L115,115 L130,115 L142,142 L250,250 L250,0 Z"></path>
<path d="M128.3,109.0 C113.8,99.7 119.0,89.6 119.0,89.6 C122.0,82.7 120.5,78.6 120.5,78.6 C119.2,72.0 123.4,76.3 123.4,76.3 C127.3,80.9 125.5,87.3 125.5,87.3 C122.9,97.6 130.6,101.9 134.4,103.2" fill="currentColor" style="transform-origin: 130px 106px;" class="octo-arm"></path>
<path d="M115.0,115.0 C114.9,115.1 118.7,116.5 119.8,115.4 L133.7,101.6 C136.9,99.2 139.9,98.4 142.2,98.6 C133.8,88.0 127.5,74.4 143.8,58.0 C148.5,53.4 154.0,51.2 159.7,51.0 C160.3,49.4 163.2,43.6 171.4,40.1 C171.4,40.1 176.1,42.5 178.8,56.2 C183.1,58.6 187.2,61.8 190.9,65.4 C194.5,69.0 197.7,73.2 200.1,77.6 C213.8,80.2 216.3,84.9 216.3,84.9 C212.7,93.1 206.9,96.0 205.4,96.6 C205.1,102.4 203.0,107.8 198.3,112.5 C181.9,128.9 168.3,122.5 157.7,114.1 C157.9,116.9 156.7,120.9 152.7,124.9 L141.0,136.5 C139.8,137.7 141.6,141.9 141.8,141.8 Z" fill="currentColor" class="octo-body"></path>
</svg>
</a>
<div class="container">
<div class="logo">
<svg xmlns="http://www.w3.org/2000/svg" viewBox="0 0 24 18" fill="#ffffff" width="110" height="85">
<path d="M23.763 6.886c-.065-.053-.673-.512-1.954-.512-.32 0-.659.03-1.01.087-.248-1.703-1.651-2.533-1.716-2.57l-.345-.2-.227.328a4.596 4.596 0 0 0-.611 1.433c-.23.972-.09 1.884.403 2.666-.596.331-1.546.418-1.744.42H.752a.753.753 0 0 0-.75.749c-.007 1.456.233 2.864.692 4.07.545 1.43 1.355 2.483 2.409 3.13 1.181.725 3.104 1.14 5.276 1.14 1.016 0 2.03-.092 2.93-.266 1.417-.273 2.705-.742 3.826-1.391a10.497 10.497 0 0 0 2.61-2.14c1.252-1.42 1.998-3.005 2.553-4.408.075.003.148.005.221.005 1.371 0 2.215-.55 2.68-1.01.505-.5.685-.998.704-1.053L24 7.076l-.237-.19Z"></path>
<path d="M2.216 8.075h2.119a.186.186 0 0 0 .185-.186V6a.186.186 0 0 0-.185-.186H2.216A.186.186 0 0 0 2.031 6v1.89c0 .103.083.186.185.186Zm2.92 0h2.118a.185.185 0 0 0 .185-.186V6a.185.185 0 0 0-.185-.186H5.136A.185.185 0 0 0 4.95 6v1.89c0 .103.083.186.186.186Zm2.964 0h2.118a.186.186 0 0 0 .185-.186V6a.186.186 0 0 0-.185-.186H8.1A.185.185 0 0 0 7.914 6v1.89c0 .103.083.186.186.186Zm2.928 0h2.119a.185.185 0 0 0 .185-.186V6a.185.185 0 0 0-.185-.186h-2.119a.186.186 0 0 0-.185.186v1.89c0 .103.083.186.185.186Zm-5.892-2.72h2.118a.185.185 0 0 0 .185-.186V3.28a.186.186 0 0 0-.185-.186H5.136a.186.186 0 0 0-.186.186v1.89c0 .103.083.186.186.186Zm2.964 0h2.118a.186.186 0 0 0 .185-.186V3.28a.186.186 0 0 0-.185-.186H8.1a.186.186 0 0 0-.186.186v1.89c0 .103.083.186.186.186Zm2.928 0h2.119a.185.185 0 0 0 .185-.186V3.28a.186.186 0 0 0-.185-.186h-2.119a.186.186 0 0 0-.185.186v1.89c0 .103.083.186.185.186Zm0-2.72h2.119a.186.186 0 0 0 .185-.186V.56a.185.185 0 0 0-.185-.186h-2.119a.186.186 0 0 0-.185.186v1.89c0 .103.083.186.185.186Zm2.955 5.44h2.118a.185.185 0 0 0 .186-.186V6a.185.185 0 0 0-.186-.186h-2.118a.185.185 0 0 0-.185.186v1.89c0 .103.083.186.185.186Z"></path>
</svg>
</div>
<h1 class="title">Docker Hub 镜像搜索</h1>
<p class="subtitle">快速查找、下载和部署 Docker 容器镜像</p>
<div class="search-container">
<input type="text" id="search-input" placeholder="输入关键词搜索镜像,如: nginx, mysql, redis...">
<button id="search-button" title="搜索">
<svg width="20" height="20" fill="none" stroke="currentColor" stroke-width="2" viewBox="0 0 24 24">
<path d="M13 5l7 7-7 7M5 5l7 7-7 7" stroke-linecap="round" stroke-linejoin="round"></path>
</svg>
</button>
</div>
<p class="tips">基于 Cloudflare Workers / Pages 构建,利用全球边缘网络实现毫秒级响应。</p>
</div>
<script>
function performSearch() {
const query = document.getElementById('search-input').value;
if (query) {
window.location.href = '/search?q=' + encodeURIComponent(query);
}
}
document.getElementById('search-button').addEventListener('click', performSearch);
document.getElementById('search-input').addEventListener('keypress', function(event) {
if (event.key === 'Enter') {
performSearch();
}
});
// 添加焦点在搜索框
window.addEventListener('load', function() {
document.getElementById('search-input').focus();
});
</script>
</body>
</html>
`;
return html;
}
export default {
async fetch(request, env, ctx) {
const getReqHeader = (key) => request.headers.get(key); // 获取请求头
let url = new URL(request.url); // 解析请求URL
const userAgentHeader = request.headers.get('User-Agent');
const userAgent = userAgentHeader ? userAgentHeader.toLowerCase() : "null";
if (env.UA) 屏蔽爬虫UA = 屏蔽爬虫UA.concat(await ADD(env.UA));
const workers_url = `https://${url.hostname}`;
// 获取请求参数中的 ns
const ns = url.searchParams.get('ns');
const hostname = url.searchParams.get('hubhost') || url.hostname;
const hostTop = hostname.split('.')[0]; // 获取主机名的第一部分
let checkHost; // 在这里定义 checkHost 变量
// 如果存在 ns 参数,优先使用它来确定 hub_host
if (ns) {
if (ns === 'docker.io') {
hub_host = 'registry-1.docker.io'; // 设置上游地址为 registry-1.docker.io
} else {
hub_host = ns; // 直接使用 ns 作为 hub_host
}
} else {
checkHost = routeByHosts(hostTop);
hub_host = checkHost[0]; // 获取上游地址
}
const fakePage = checkHost ? checkHost[1] : false; // 确保 fakePage 不为 undefined
console.log(`域名头部: ${hostTop} 反代地址: ${hub_host} searchInterface: ${fakePage}`);
// 更改请求的主机名
url.hostname = hub_host;
const hubParams = ['/v1/search', '/v1/repositories'];
if (屏蔽爬虫UA.some(fxxk => userAgent.includes(fxxk)) && 屏蔽爬虫UA.length > 0) {
// 首页改成一个nginx伪装页
return new Response(await nginx(), {
headers: {
'Content-Type': 'text/html; charset=UTF-8',
},
});
} else if ((userAgent && userAgent.includes('mozilla')) || hubParams.some(param => url.pathname.includes(param))) {
if (url.pathname == '/') {
if (env.URL302) {
return Response.redirect(env.URL302, 302);
} else if (env.URL) {
if (env.URL.toLowerCase() == 'nginx') {
//首页改成一个nginx伪装页
return new Response(await nginx(), {
headers: {
'Content-Type': 'text/html; charset=UTF-8',
},
});
} else return fetch(new Request(env.URL, request));
} else {
if (fakePage) return new Response(await searchInterface(), {
headers: {
'Content-Type': 'text/html; charset=UTF-8',
},
});
}
} else {
if (fakePage) url.hostname = 'hub.docker.com';
if (url.searchParams.get('q')?.includes('library/') && url.searchParams.get('q') != 'library/') {
const search = url.searchParams.get('q');
url.searchParams.set('q', search.replace('library/', ''));
}
const newRequest = new Request(url, request);
return fetch(newRequest);
}
}
// 修改包含 %2F 和 %3A 的请求
if (!/%2F/.test(url.search) && /%3A/.test(url.toString())) {
let modifiedUrl = url.toString().replace(/%3A(?=.*?&)/, '%3Alibrary%2F');
url = new URL(modifiedUrl);
console.log(`handle_url: ${url}`);
}
// 处理token请求
if (url.pathname.includes('/token')) {
let token_parameter = {
headers: {
'Host': 'auth.docker.io',
'User-Agent': getReqHeader("User-Agent"),
'Accept': getReqHeader("Accept"),
'Accept-Language': getReqHeader("Accept-Language"),
'Accept-Encoding': getReqHeader("Accept-Encoding"),
'Connection': 'keep-alive',
'Cache-Control': 'max-age=0'
}
};
let token_url = auth_url + url.pathname + url.search;
return fetch(new Request(token_url, request), token_parameter);
}
// 修改 /v2/ 请求路径
if (hub_host == 'registry-1.docker.io' && /^\/v2\/[^/]+\/[^/]+\/[^/]+$/.test(url.pathname) && !/^\/v2\/library/.test(url.pathname)) {
//url.pathname = url.pathname.replace(/\/v2\//, '/v2/library/');
url.pathname = '/v2/library/' + url.pathname.split('/v2/')[1];
console.log(`modified_url: ${url.pathname}`);
}
// 构造请求参数
let parameter = {
headers: {
'Host': hub_host,
'User-Agent': getReqHeader("User-Agent"),
'Accept': getReqHeader("Accept"),
'Accept-Language': getReqHeader("Accept-Language"),
'Accept-Encoding': getReqHeader("Accept-Encoding"),
'Connection': 'keep-alive',
'Cache-Control': 'max-age=0'
},
cacheTtl: 3600 // 缓存时间
};
// 添加Authorization头
if (request.headers.has("Authorization")) {
parameter.headers.Authorization = getReqHeader("Authorization");
}
// 添加可能存在字段X-Amz-Content-Sha256
if (request.headers.has("X-Amz-Content-Sha256")) {
parameter.headers['X-Amz-Content-Sha256'] = getReqHeader("X-Amz-Content-Sha256");
}
// 发起请求并处理响应
let original_response = await fetch(new Request(url, request), parameter);
let original_response_clone = original_response.clone();
let original_text = original_response_clone.body;
let response_headers = original_response.headers;
let new_response_headers = new Headers(response_headers);
let status = original_response.status;
// 修改 Www-Authenticate 头
if (new_response_headers.get("Www-Authenticate")) {
let auth = new_response_headers.get("Www-Authenticate");
let re = new RegExp(auth_url, 'g');
new_response_headers.set("Www-Authenticate", response_headers.get("Www-Authenticate").replace(re, workers_url));
}
// 处理重定向
if (new_response_headers.get("Location")) {
const location = new_response_headers.get("Location");
console.info(`Found redirection location, redirecting to ${location}`);
return httpHandler(request, location, hub_host);
}
// 返回修改后的响应
let response = new Response(original_text, {
status,
headers: new_response_headers
});
return response;
}
};
/**
* 处理HTTP请求
* @param {Request} req 请求对象
* @param {string} pathname 请求路径
* @param {string} baseHost 基地址
*/
function httpHandler(req, pathname, baseHost) {
const reqHdrRaw = req.headers;
// 处理预检请求
if (req.method === 'OPTIONS' &&
reqHdrRaw.has('access-control-request-headers')
) {
return new Response(null, PREFLIGHT_INIT);
}
let rawLen = '';
const reqHdrNew = new Headers(reqHdrRaw);
reqHdrNew.delete("Authorization"); // 修复s3错误
const refer = reqHdrNew.get('referer');
let urlStr = pathname;
const urlObj = newUrl(urlStr, 'https://' + baseHost);
/** @type {RequestInit} */
const reqInit = {
method: req.method,
headers: reqHdrNew,
redirect: 'follow',
body: req.body
};
return proxy(urlObj, reqInit, rawLen);
}
/**
* 代理请求
* @param {URL} urlObj URL对象
* @param {RequestInit} reqInit 请求初始化对象
* @param {string} rawLen 原始长度
*/
async function proxy(urlObj, reqInit, rawLen) {
const res = await fetch(urlObj.href, reqInit);
const resHdrOld = res.headers;
const resHdrNew = new Headers(resHdrOld);
// 验证长度
if (rawLen) {
const newLen = resHdrOld.get('content-length') || '';
const badLen = (rawLen !== newLen);
if (badLen) {
return makeRes(res.body, 400, {
'--error': `bad len: ${newLen}, except: ${rawLen}`,
'access-control-expose-headers': '--error',
});
}
}
const status = res.status;
resHdrNew.set('access-control-expose-headers', '*');
resHdrNew.set('access-control-allow-origin', '*');
resHdrNew.set('Cache-Control', 'max-age=1500');
// 删除不必要的头
resHdrNew.delete('content-security-policy');
resHdrNew.delete('content-security-policy-report-only');
resHdrNew.delete('clear-site-data');
return new Response(res.body, {
status,
headers: resHdrNew
});
}
async function ADD(envadd) {
var addtext = envadd.replace(/[ |"'\r\n]+/g, ',').replace(/,+/g, ','); // 将空格、双引号、单引号和换行符替换为逗号
if (addtext.charAt(0) == ',') addtext = addtext.slice(1);
if (addtext.charAt(addtext.length - 1) == ',') addtext = addtext.slice(0, addtext.length - 1);
const add = addtext.split(',');
return add;
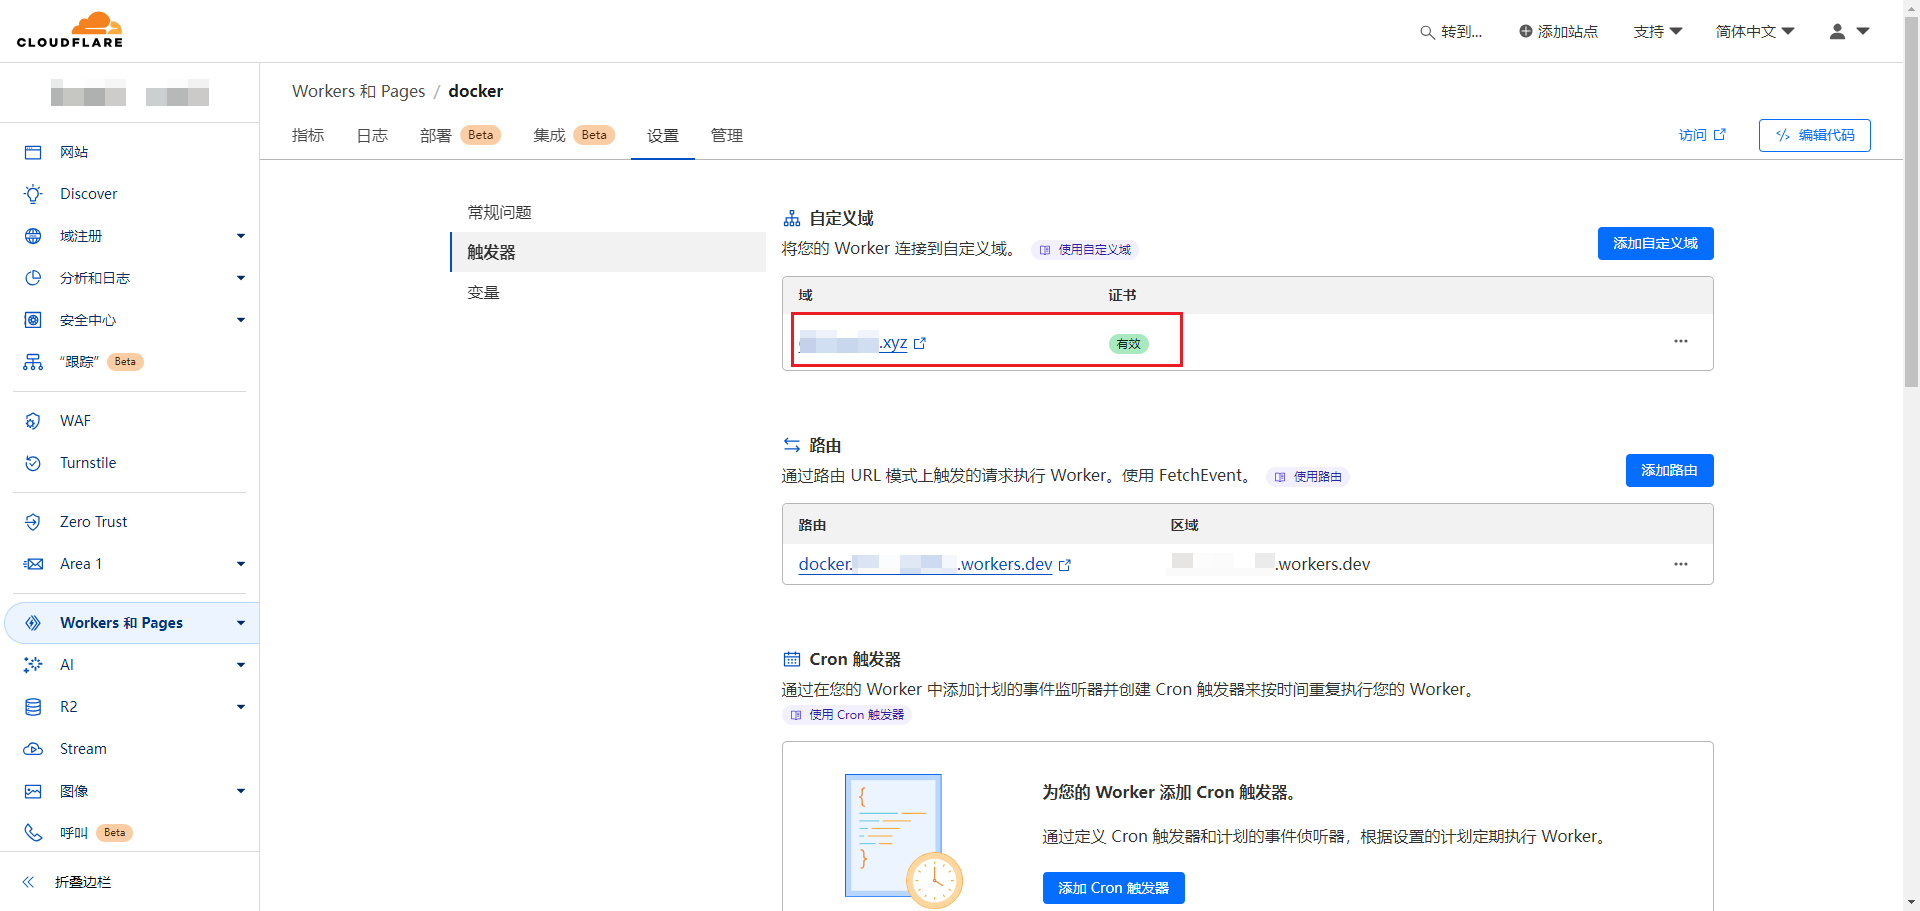
}三、 绑定域名
点击 docker 进入 Worker 页面,点击 设置 > 触发器 > 添加自定义域,输入你要绑定的域名,等待创建完成,如下图所示:
四、访问镜像代理首页
访问域名,可查看镜像代理的使用说明:

五、更换docker镜像源
sudo tee /etc/docker/daemon.json <<-'EOF'
{
  "registry-mirrors": ["https://上面填好的域名"]
}
EOF
sudo systemctl daemon-reload
sudo systemctl restart docker
1 条评论
真棒!